
-
 Alright in order to fix your E2 Series you need to update with our latest firmware and here is the how to, These steps will fix your E2 Series right away, To update your E2 Series just follow these steps. 1. You need to have a few items. – 10 minutes – USB Thumb drive or I would use USB Thumb drive. now you need to download this zip file Hookup the MicroSD or USB to your Computer, Transfer the zip file to USB drive, – hook up the MicroSD to your E2 Series These steps will help you place your E2 Series to Recovery Screen, unless your box already booting directly to recovery then you can bypass this section. #1 Make sure your TV is on, HDMI wire is hooked up to the box, and no power line connection #2 Hold the toothpick in the AV port push you will feel a little click, then hold that click #3 Hookup the Power while holding the toothpick inside of the AV port, for 17 seconds you will see the recovery screen. Once you see this Screen, take the Toothpick out of the AV port. Using your Remote point towards the and follow next steps. – Now scroll down and Select “Apply update from external storage“ – Select update from USB Drive – Select your file and Click OK on your Remote. – let it update its thing and once done you will see it goes back to the main recovery screen. – Now Select Reboot system now – let it go through rebooting it will take a good 3 to 4 minutes. You will be presented to the welcome screen again and use your remote to pair and set up normally this time it will go through the main screen.
 -
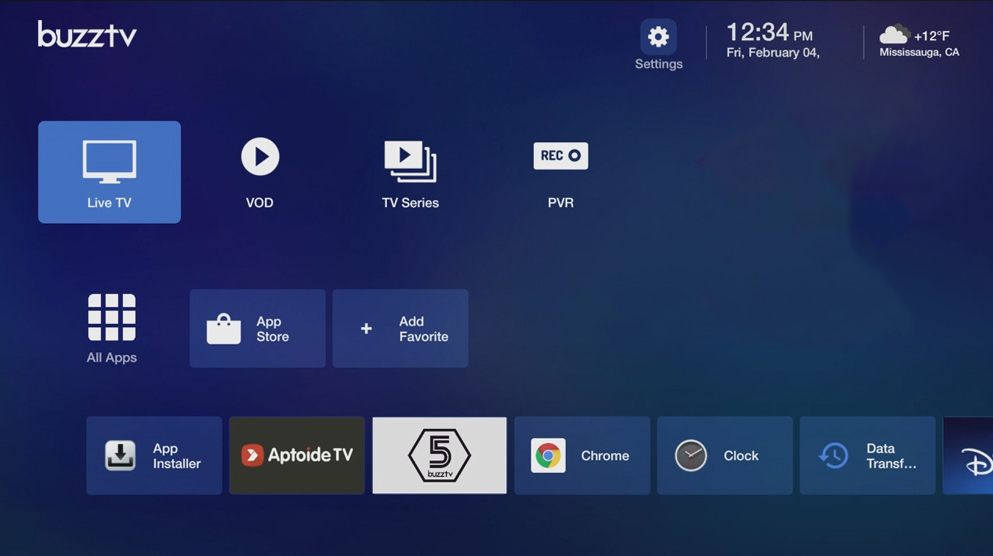
1. Scroll to the right to change the screen. 2. Scroll and Select Buzz Utilities 3. Scroll up and Select Home Screen. 4. Scroll down and Select BuzzTV Modern. 5. As you can See you have changed the launcher back to modern. Enjoy!
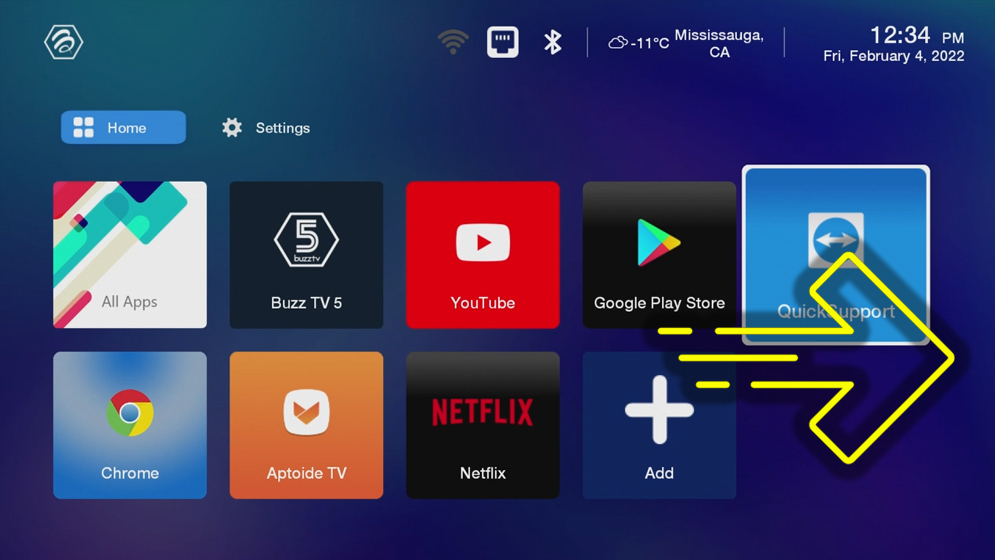
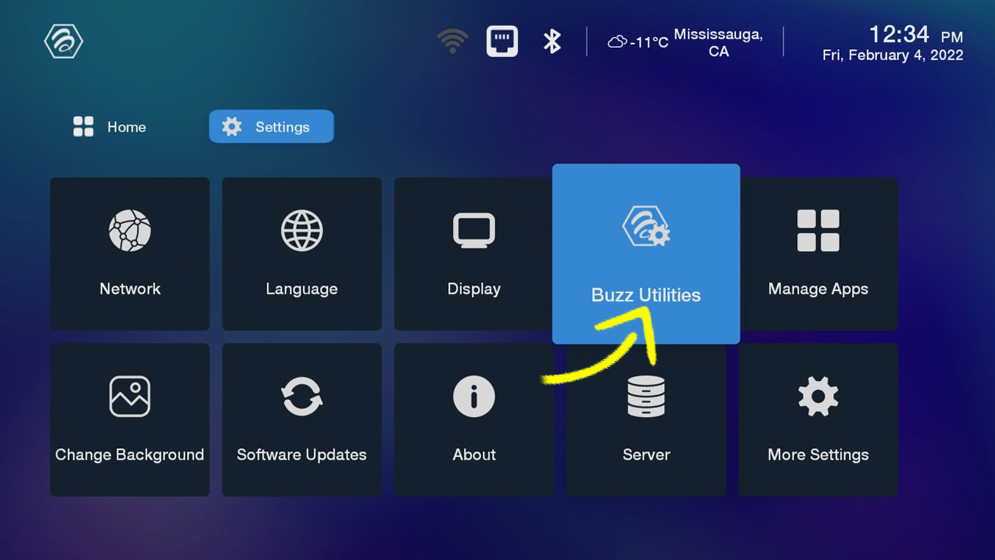
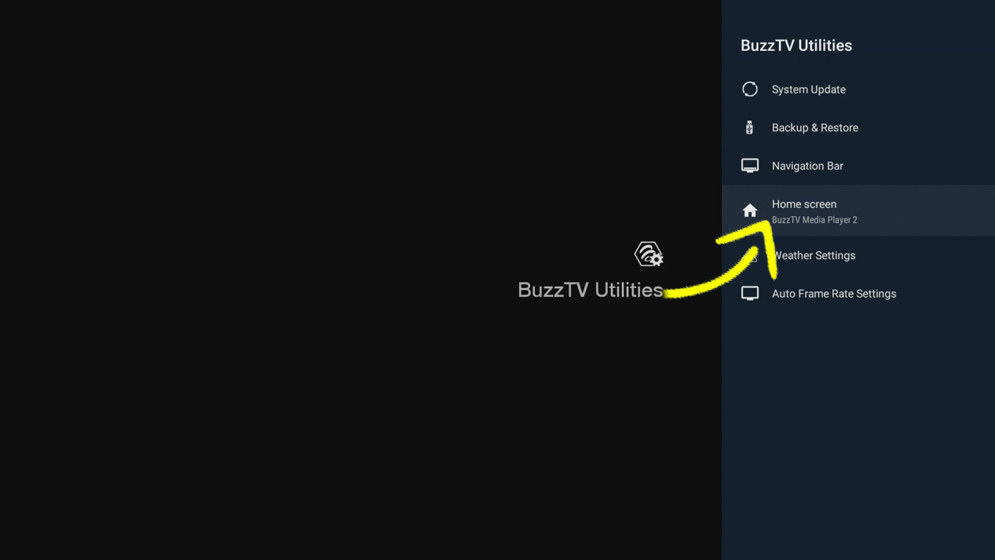
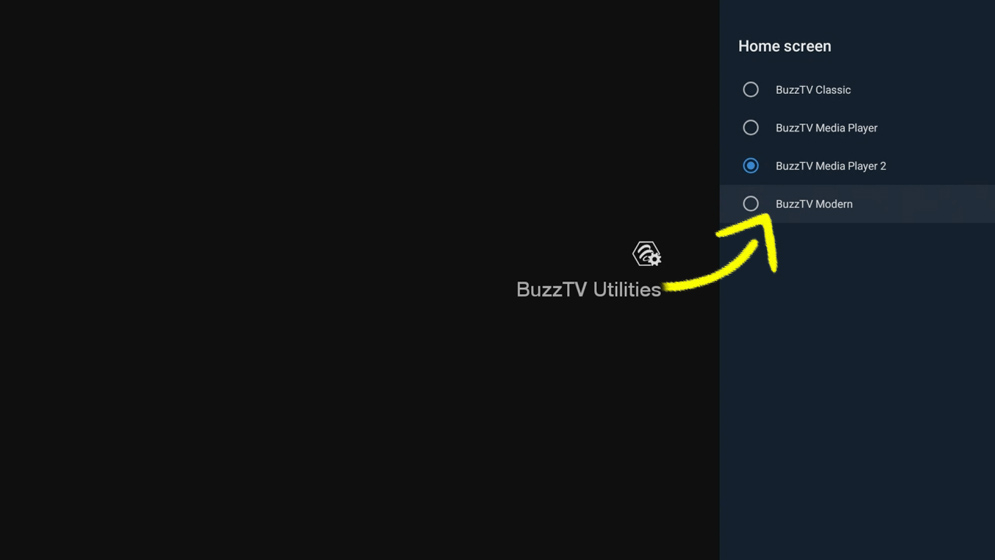
-
mine took like 2 minutes for checking, but i had the update log shown up right away, now downloading new update, can't wait to play with the update. Thanx guys.
-
 Alright in order to fix your E1 Series you need to update with our latest firmware and here is the how to, These steps will fix your E1 Series right away, To update your E1 Series just follow these steps. 1. You need to have a few items. – 10 minutes – USB Thumb drive or I would use USB Thumb drive. now you need to download this zip file Hookup the MicroSD or USB to your Computer, Transfer the zip file to USB drive, – hook up the MicroSD to your E1 Series These steps will help you place your E1 Series to Recovery Screen, unless your box already booting directly to recovery then you can bypass this section. #1 Make sure your TV is on, HDMI wire is hooked up to the box, and no power line connection #2 Hold the toothpick in the AV port push you will feel a little click, then hold that click #3 Hookup the Power while holding the toothpick inside of the AV port, for 17 seconds you will see the recovery screen. Once you see this Screen, take the Toothpick out of the AV port. Using your Remote point towards the and follow next steps. – Now scroll down and Select “Apply update from external storage“ – Select update from USB Drive – Select your file and Click OK on your Remote. – let it update its thing and once done you will see it goes back to the main recovery screen. – Now Select Reboot system now – let it go through rebooting it will take a good 3 to 4 minutes. You will be presented to the welcome screen again and use your remote to pair and set up normally this time it will go through the main screen.
 -
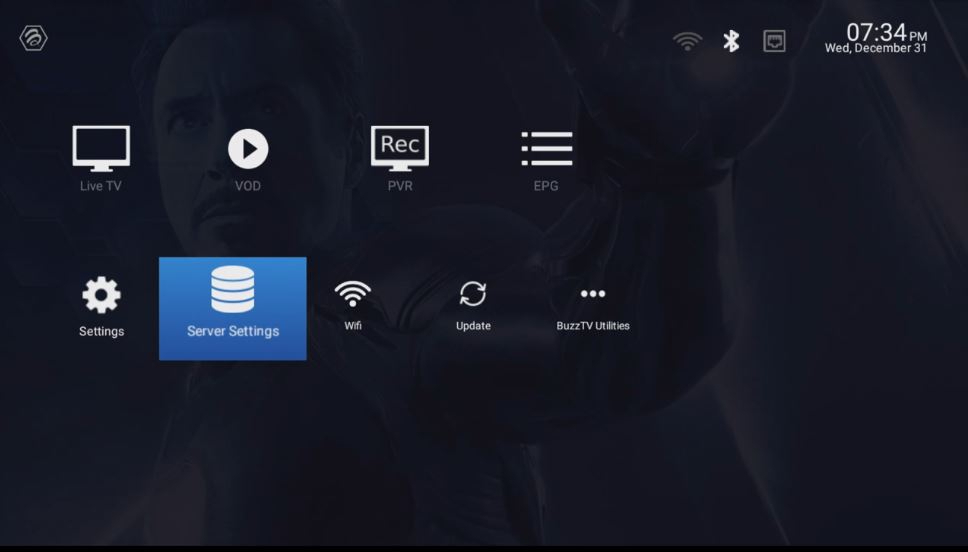
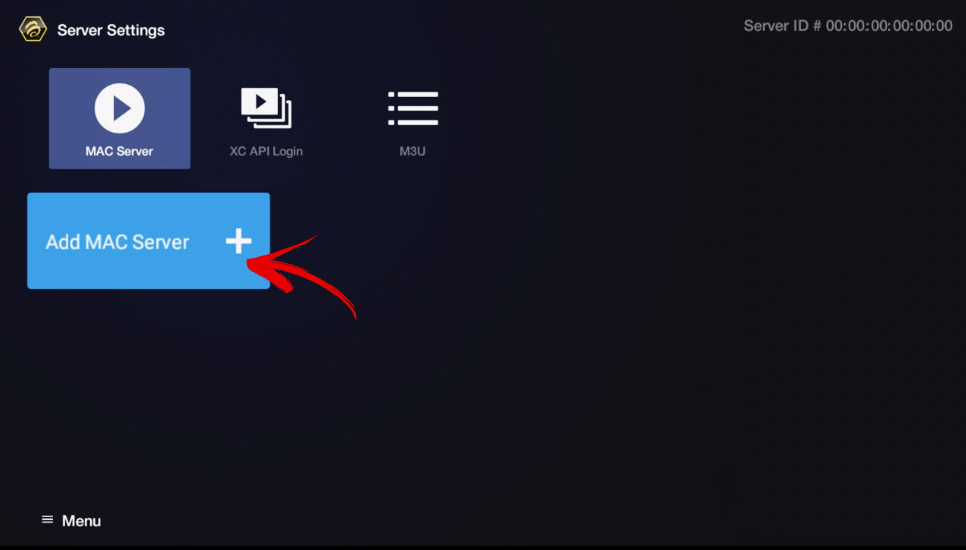
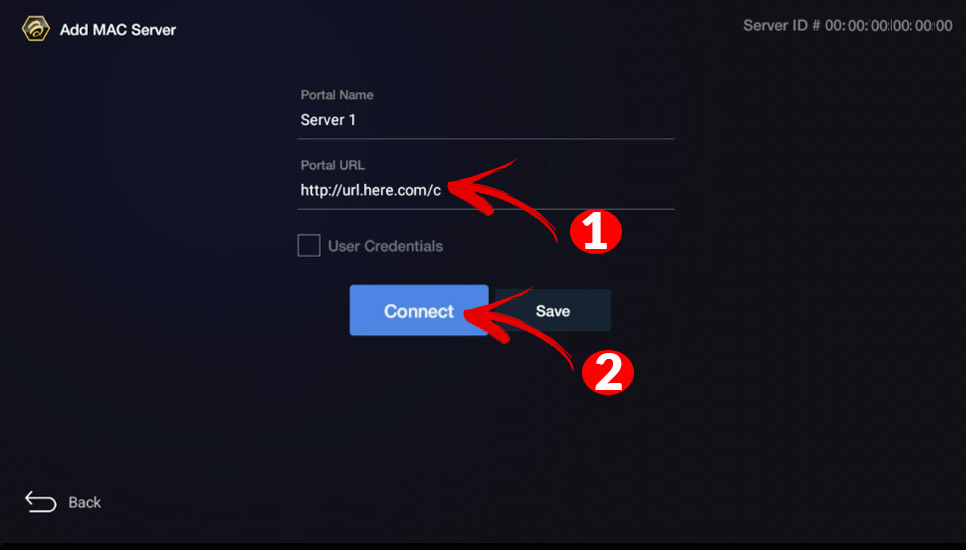
Note: Remember, BuzzTV does not provide service, does not make any recommendations for service and is not affiliated with any service providers. ---- Here is a step-by-step example: 1. From main screen scroll down and Select Server Settings, 2. Select Your Server type (in this example adding MAC server is shown) 3. Add Your Portal Name 3.1 Type your URL for your Portal ( Portal URL provided by your LiveTV provider ) 3.2 Click on Connect Enjoy your LiveTV Experience.
-
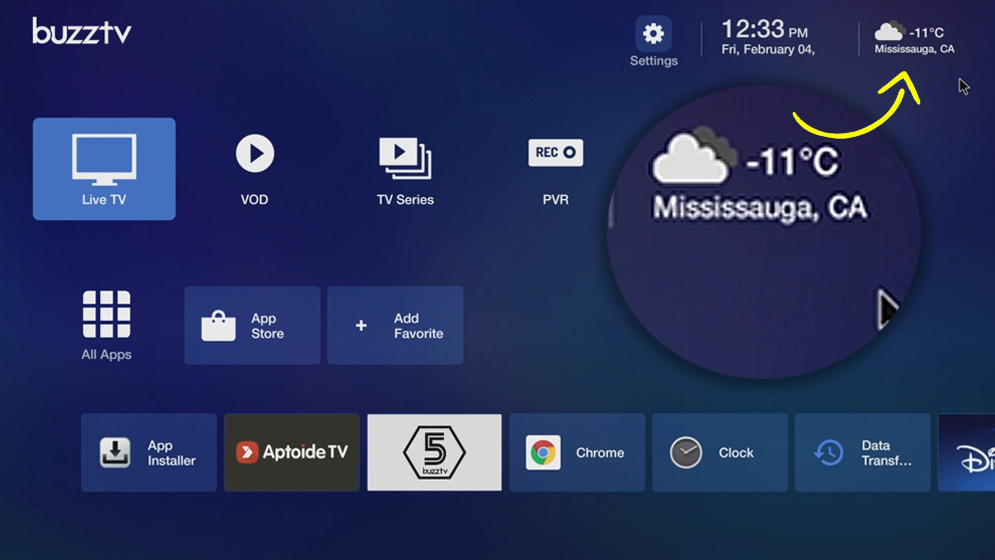
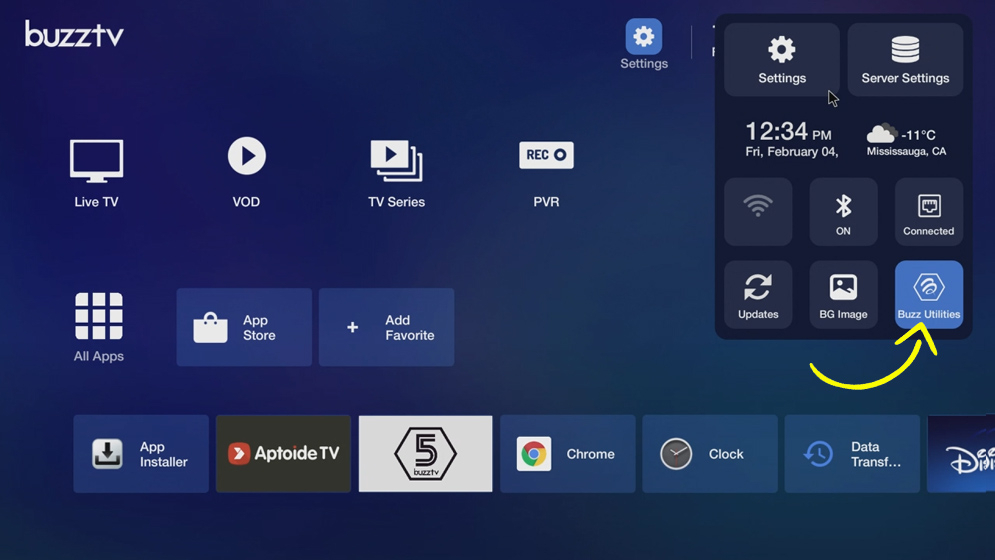
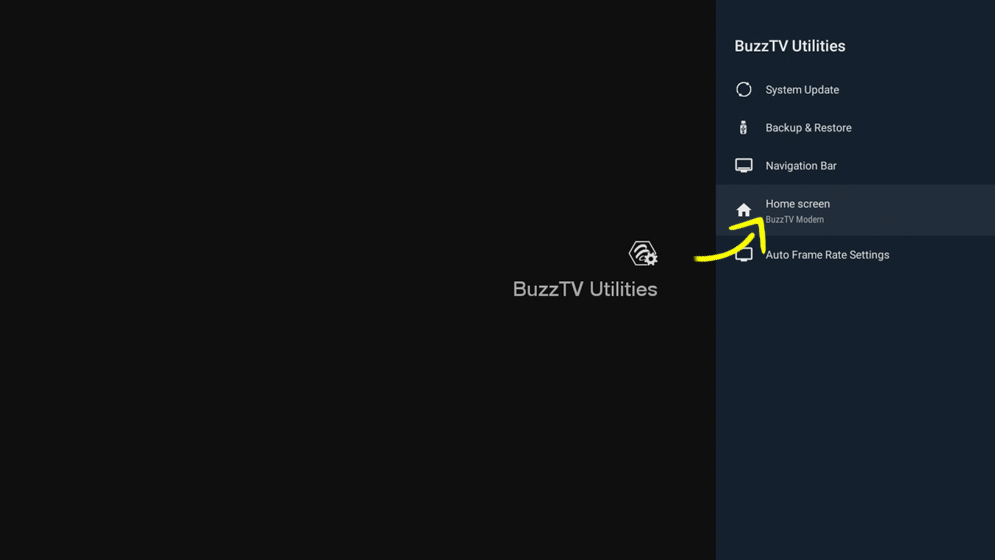
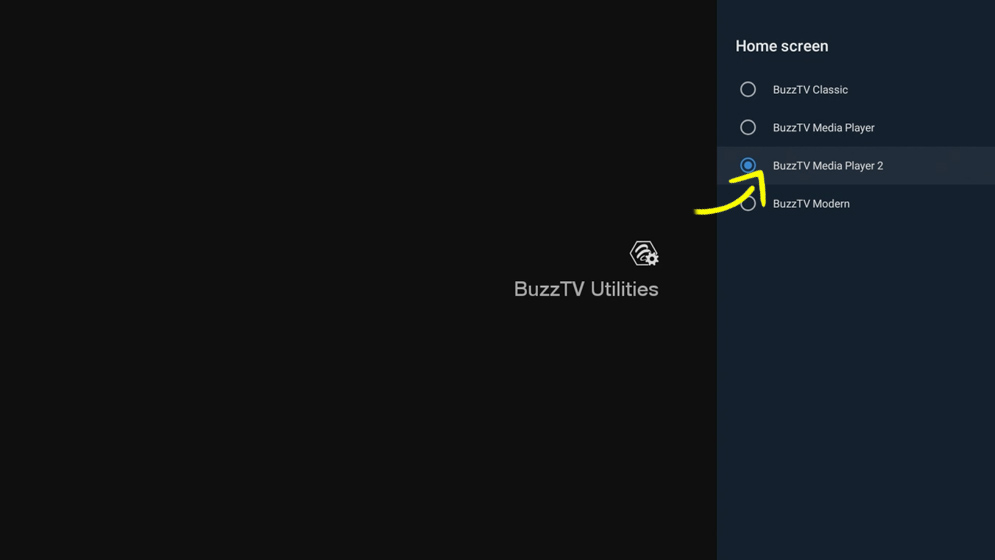
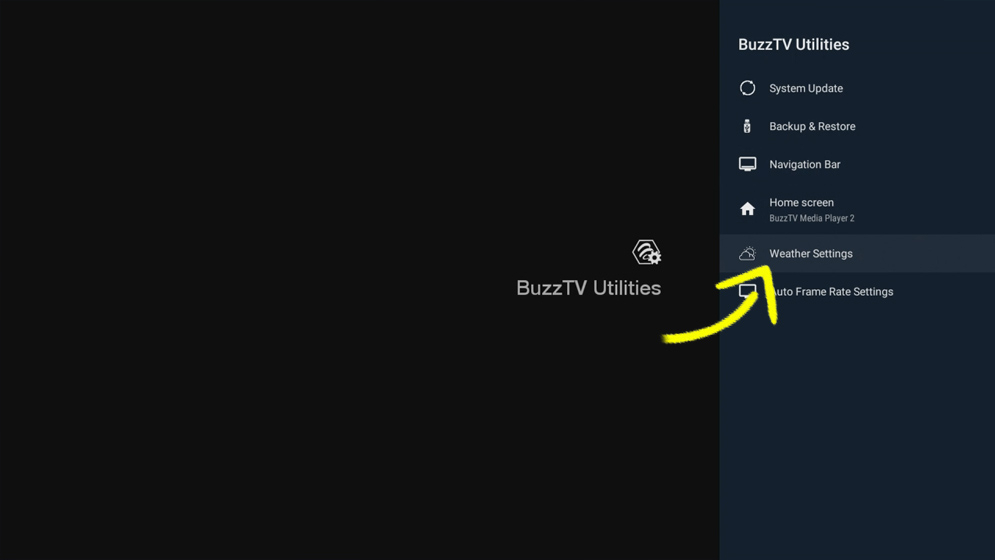
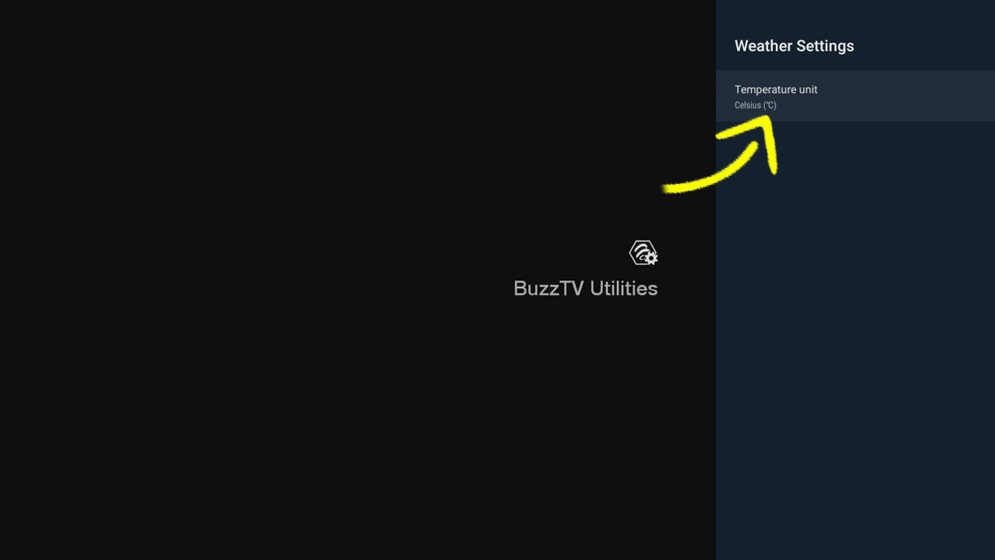
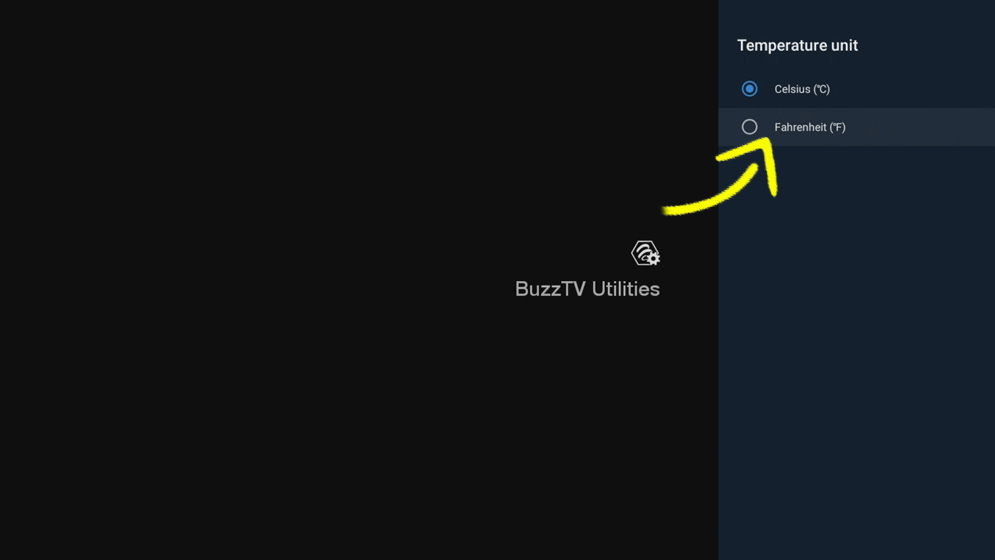
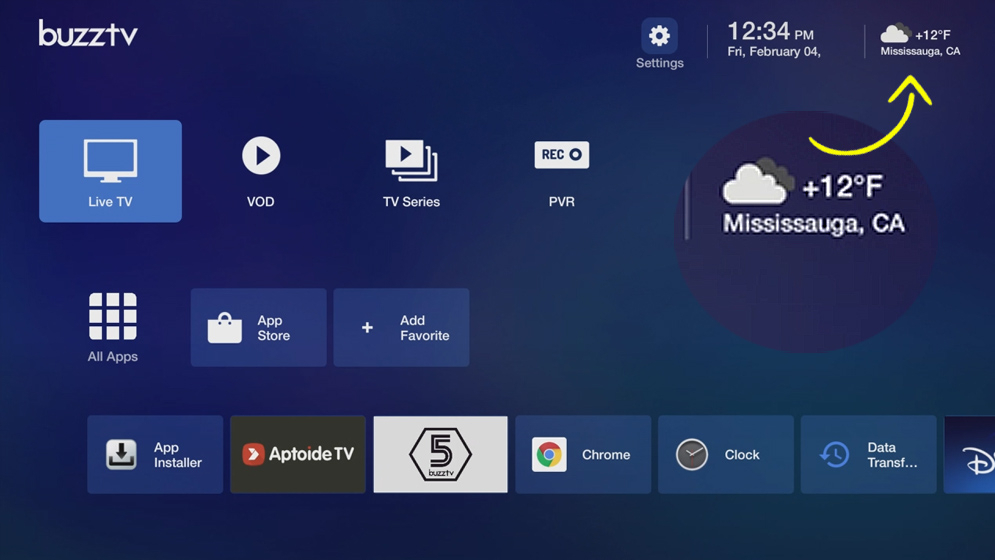
1. To toggle between Celsius and Fahrenheit follow these steps. 2. Scroll up to Settings icon and Select Buzz Utilities. 3. Scroll Down and Select Home Screen 4. Scroll down and Select BuzzTV Media Player 2 5. Scroll to the right to change the screen. 6. Scroll and Select Buzz Utilities 7. Scroll down and Select Weather Settings. 8. Select Temperature unit. 9. Change from Celsius to Fahrenheit or From Fahrenheit to Celsius. 10. Press back 11. Scroll up and Select Home Screen. 12. Scroll down and Select BuzzTV Modern. 13. As you can See in picture the Weather Widget Changed from Celsius to Fahrenheit. Enjoy!
-
 Alright in order to fix your XRS4900 you need to update with our latest firmware and here is the how to, These steps will fix your XRS4900 right away, To update your XRS4900 just follow these steps. 1. You need to have a few items. – 10 minutes – USB Thumb drive or I would use USB Thumb drive. now you need to download this zip file Hookup the MicroSD or USB to your Computer, Transfer the zip file to USB drive, – hook up the MicroSD to your XRS4900 These steps will help you place your XRS4900 to Recovery Screen, unless your box already booting directly to recovery then you can bypass this section. #1 Make sure your TV is on, HDMI wire is hooked up to the box, and no power line connection #2 Hold the toothpick in the AV port push you will feel a little click, then hold that click #3 Hookup the Power while holding the toothpick inside of the AV port, for 17 seconds you will see the recovery screen. Once you see this Screen, take the Toothpick out of the AV port. Using your Remote point towards the XRS4900 and follow next steps. – Now scroll down and Select “Apply update from external storage“ – Select update from USB Drive – Select your file and Click OK on your Remote. – let it update its thing and once done you will see it goes back to the main recovery screen. – Now Select Reboot system now – let it go through rebooting it will take a good 3 to 4 minutes. You will be presented to the welcome screen again and use your remote to pair and set up normally this time it will go through the main screen.
 -
 Alright in order to fix your 4000 series you need to update with our latest firmware and here is the how to, These steps will fix your 4000 series right away, To update your 4000 Series just follow these steps. 1. You need to have a few items. – 10 minutes – USB Thumb drive or I would use USB Thumb drive. now you need to download this zip file Hookup the USB Thumb drive to your Computer, Transfer the zip file to USB drive, – hook up the MicroSD to your 4000 series Turn your box on and since it is already going to recovery screen https://youtu.be/1TKa88hjjrg – you should see a Recovery screen, – Now scroll down and Select “Apply update from external storage“ – Select update from USB Drive – Select your file and Click OK on your Remote. – let it update its thing and once done you will see it goes back to the main recovery screen. – Now Select Reboot system now – let it go through rebooting it will take a good 3 to 4 minutes. You will be presented to the welcome screen again and use your remote to pair and set up normally this time it will go through the main screen.
 -
 Alright in order to fix your 4500 series you need to update with our latest firmware and here is the how to, These steps will fix your 4500 series right away, To update your 4500 Series just follow these steps. 1. You need to have a few items. – 10 minutes – USB Thumb drive or I would use USB Thumb drive. now you need to download this zip file Hookup the USB Thumb drive to your Computer, Transfer the zip file to USB drive, – hook up the MicroSD to your 4500 series Turn your box on and since it is already going to recovery screen try this method, you just need to get to recovery screen. – Now scroll down and Select “Apply update from external storage“ – Select update from USB Drive – Select your file and Click OK on your Remote. – let it update its thing and once done you will see it goes back to the main recovery screen. – Now Select Reboot system now – let it go through rebooting it will take a good 3 to 4 minutes. You will be presented to the welcome screen again and use your remote to pair and set up normally this time it will go through the main screen. keep us updated on your findings.
 -
 This version of file is made for people that have VidStick / VidStick Plus / VidStick MAX. and there download keep failing, Alright in order to fix your VidStick you need to update with our latest firmware and here is the how to, These steps will fix your VidStick right away, To update your Vidstick just follow these steps. 1. You need to have a few items. – 10 minutes – Thumbtack – USB Thumb drive or I would use USB Thumb drive. now you need to download this zip file Hookup the MicroSD or USB to your Computer, Transfer the zip file to USB drive, – hook up the MicroSD to your VidStick – make sure you hookup the IR extender to the power adapter, – Use your Thumbtack at the reset hole beside the power connection, till you feel a little click and hold it, Then hookup the power wire to the VidStick, while holding the thumbtack to the stick for next 15 seconds. – after 15 seconds you can let go of the thumbtack, hook up the VidStick to your TV, but do not remove the power adapter from the VidStick. – you should see a Recovery screen, – Now scroll down and Select “Apply update from external storage“ – Select update from USB Drive – Select your file and Click OK on your Remote. – let it update its thing and once done you will see it goes back to the main recovery screen. – Now Select Reboot system now – let it go through rebooting it will take a good 3 to 4 minutes. You will be presented to the welcome screen again and use your remote to pair and set up normally this time it will go through the main screen. When you are in welcome screen and asking you to pair the remote press the back button and click ok to use remote as IR. keep us updated on your findings.
 -
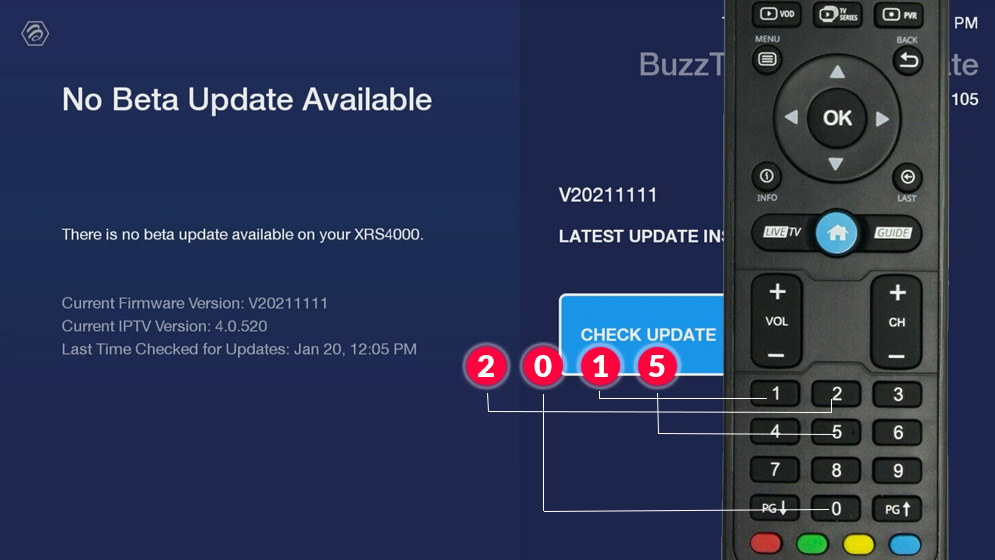
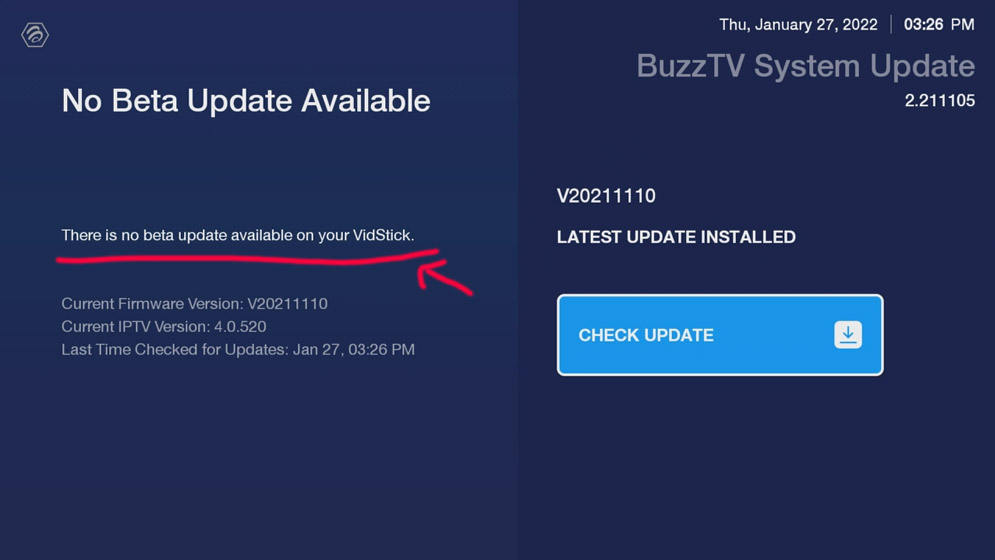
There are few reasons that you may see this (( No Beta Update Available )) 1. You recently purchased your box or just activated it. 2. You do not have the Nov 08 update or newer. if you have entered the code(( 2015 ) it will place the device in a Que to update to Buzztv 5 beta. Please allow up to 7 days. Note: if your box is Nov 8 or newer and you have entered the code ((2015)) and you have not been able to get the update, please create a ticket by visiting buzztv.com and there is a little " ? " (Question mark) at the bottom right hand side. Click on it and provide your info including the box serial number and MAC address and request to be entered in buzztv 5 Beta Que. You will receive an email back accordingly for any additional steps or clarifications.
-
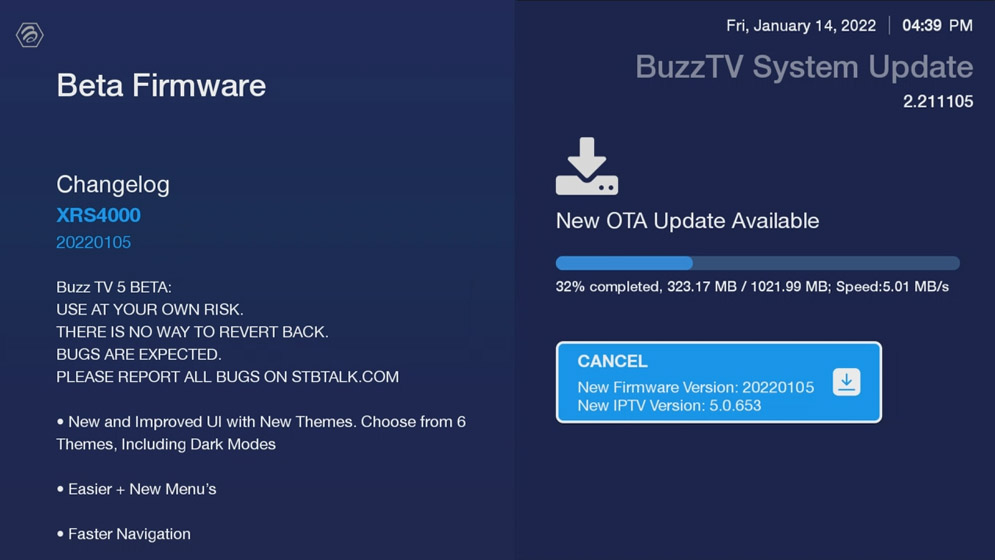
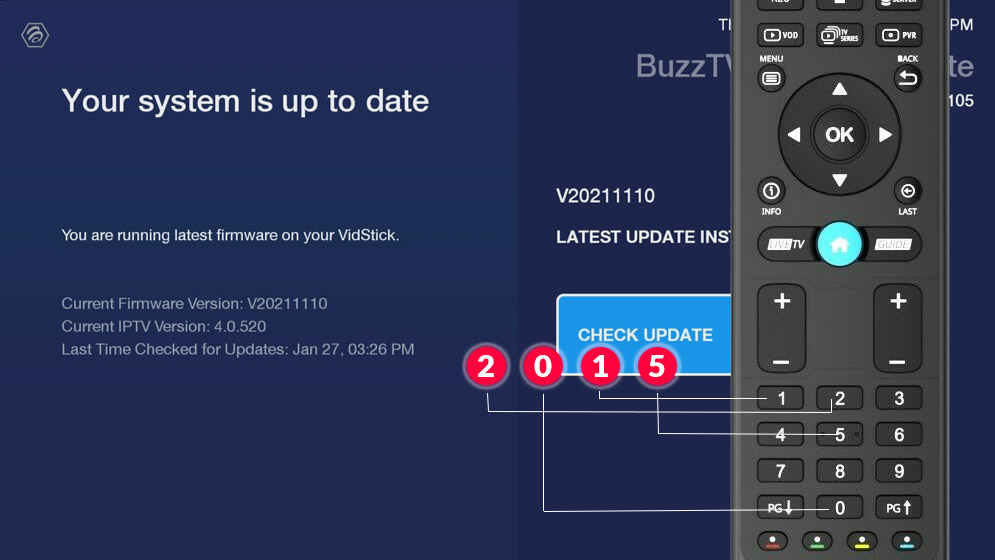
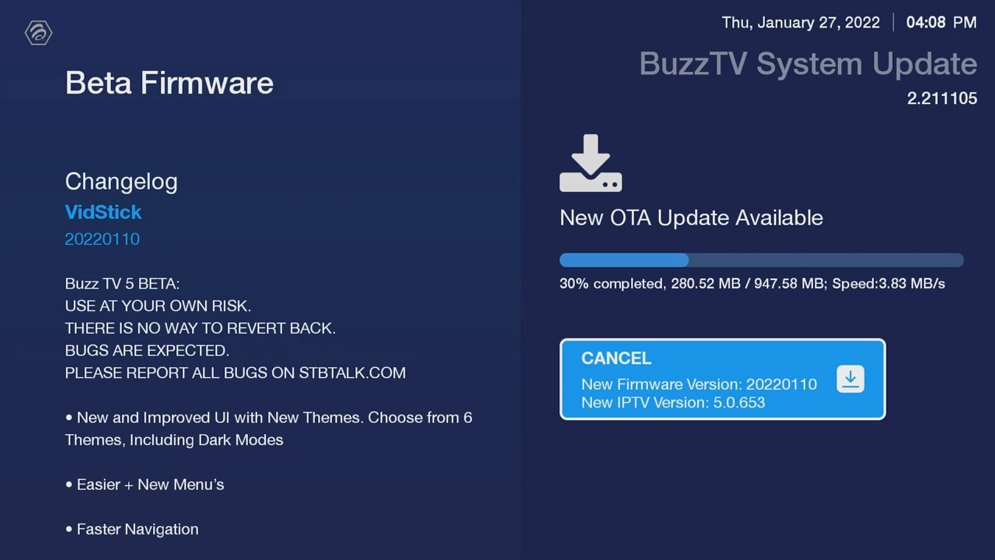
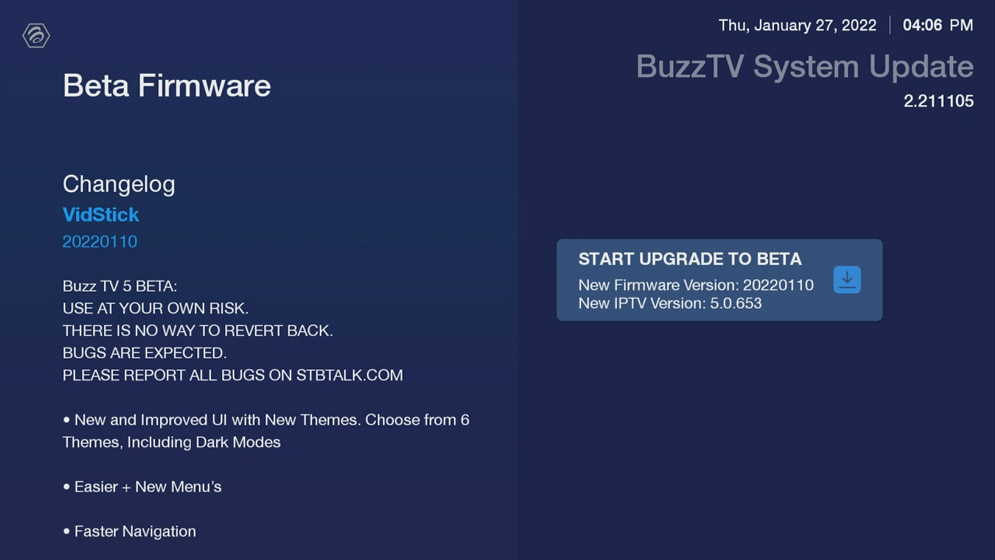
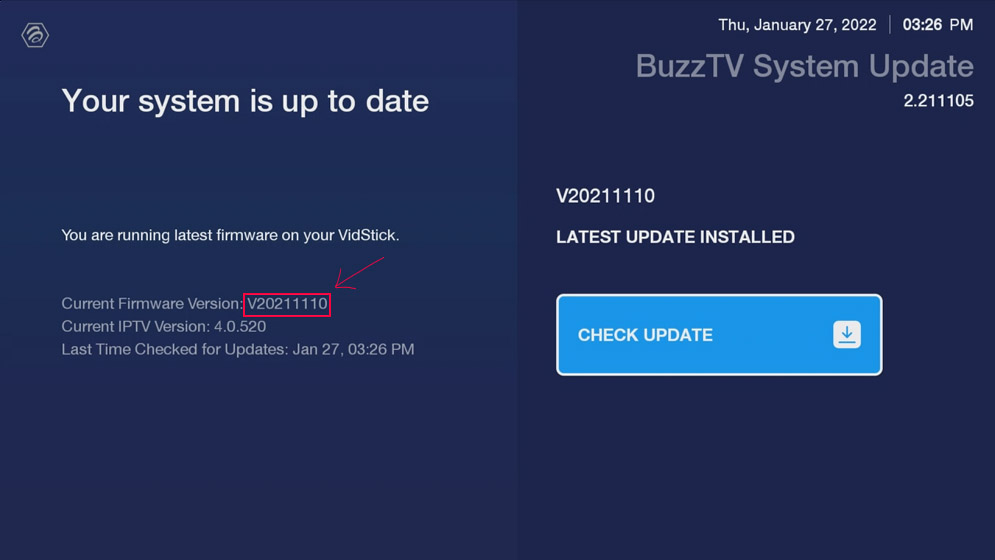
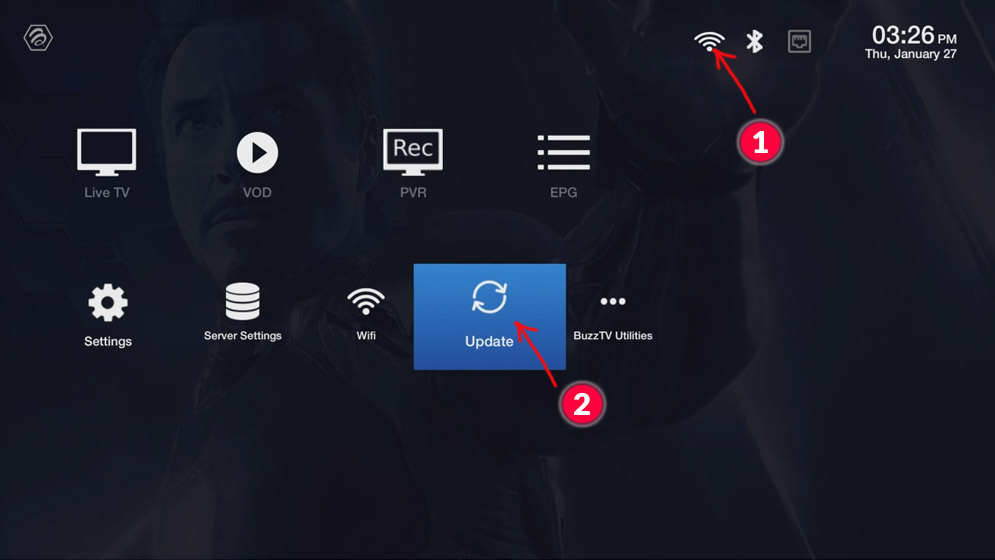
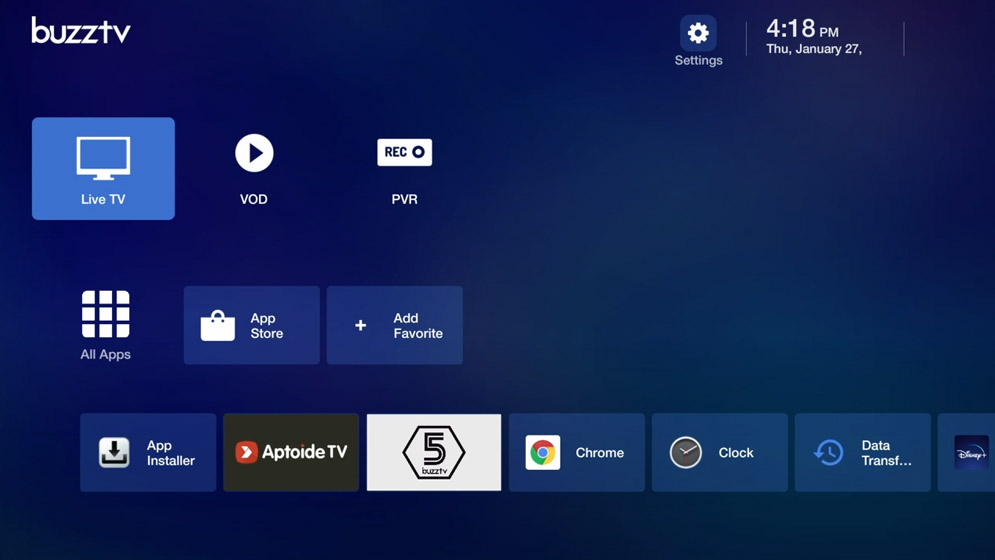
Follow these steps to update your Vidstick series to Buzztv 5 Beta Buzz TV 5 BETA: USE AT YOUR OWN RISK. THERE IS NO WAY TO REVERT BACK. BUGS ARE EXPECTED. PLEASE REPORT ALL BUGS ON STBTALK.COM 1. Make sure your WIFI is connected. 2. Scroll down to Update and Select it. 2. Check for latest update and it should be (( V20211110 )) 3. Now using your Remote you have to type (( 2015 )) and it will start checking for beta update. - If you didn't get the update Click Here to learn more... 4. When you see this update click Start Upgrade to Beta, 5. Now Let Downloading finish and reboots your box after word. 6. Enjoy Your Buzztv 5 beta upgrade.
-
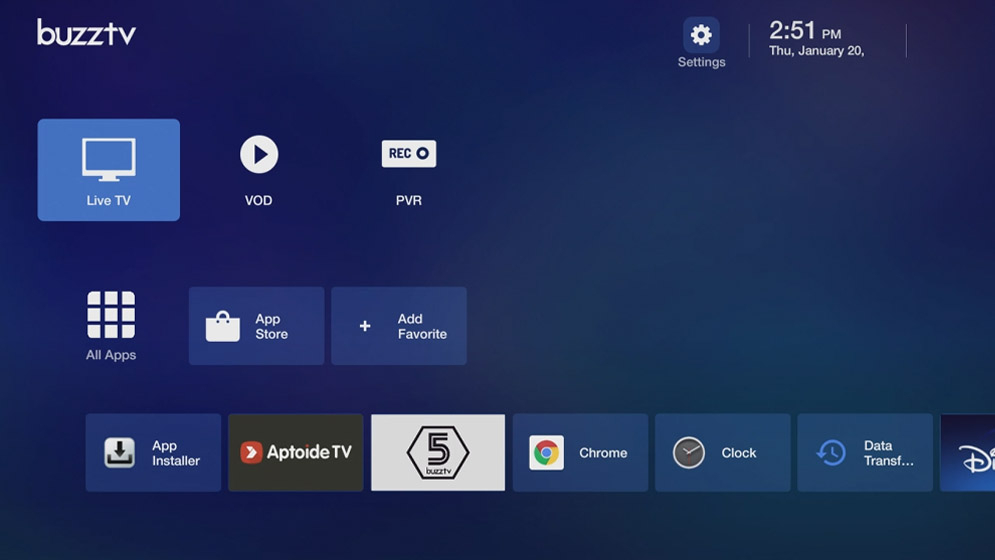
Here is how you can get to Buzztv 5 beta
-
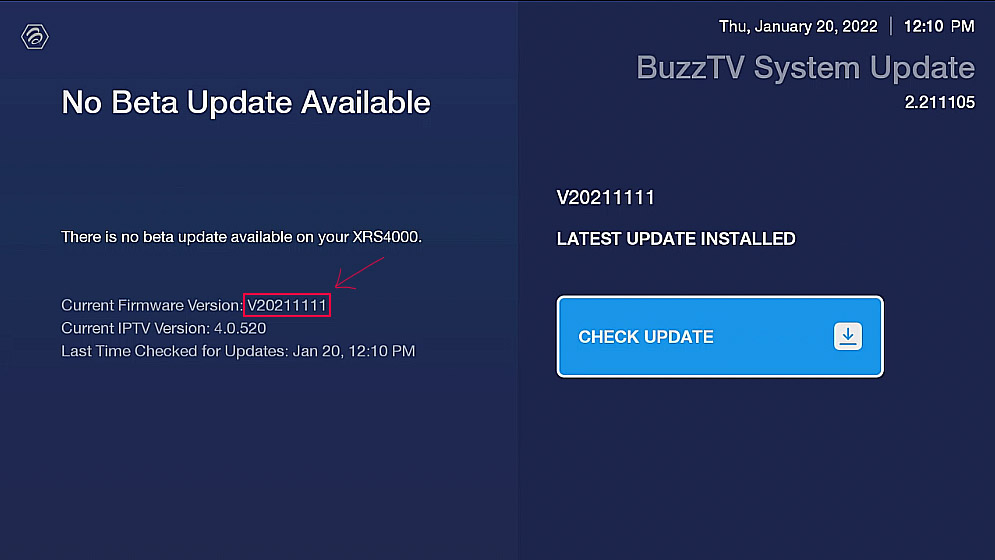
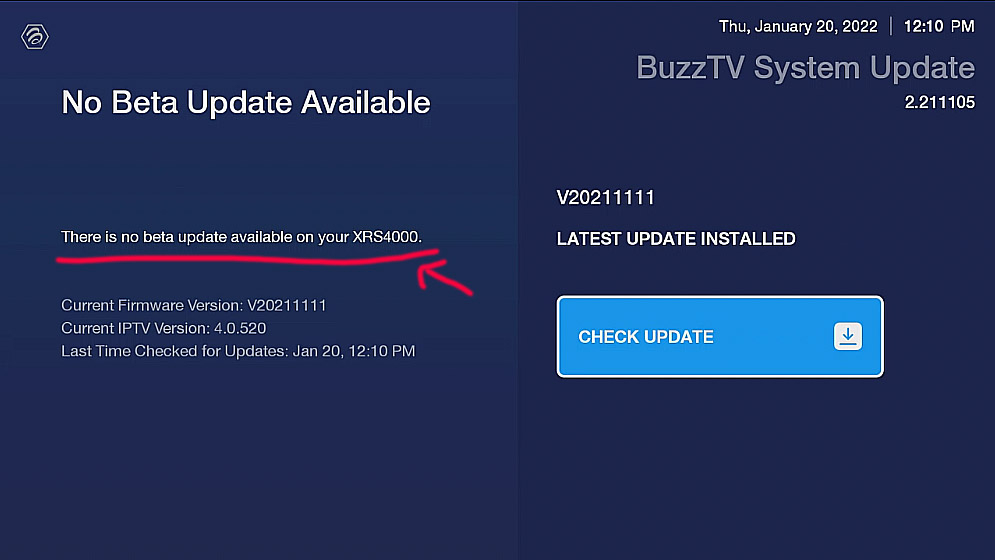
There are few reasons that you may see this (( No Beta Update Available )) 1. You recently purchased your box or just activated it. 2. You do not have the Nov 11 update or newer. if you have entered the code(( 2015 ) it will place the device in a Que to update to Buzztv 5 beta. Please allow up to 7 days. Note: if your box is Nov 11 or newer and you have entered the code ((2015)) and you have not been able to get the update, please create a ticket by visiting buzztv.com and there is a little " ? " (Question mark) at the bottom right hand side. Click on it and provide your info including the box serial number and MAC address and request to be entered in buzztv 5 Beta Que. You will receive an email back accordingly for any additional steps or clarifications.
-
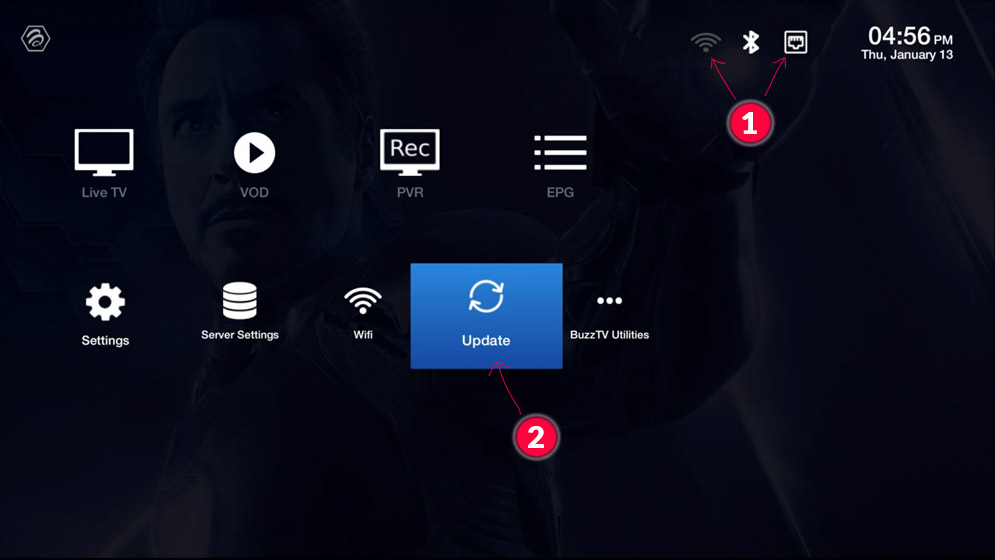
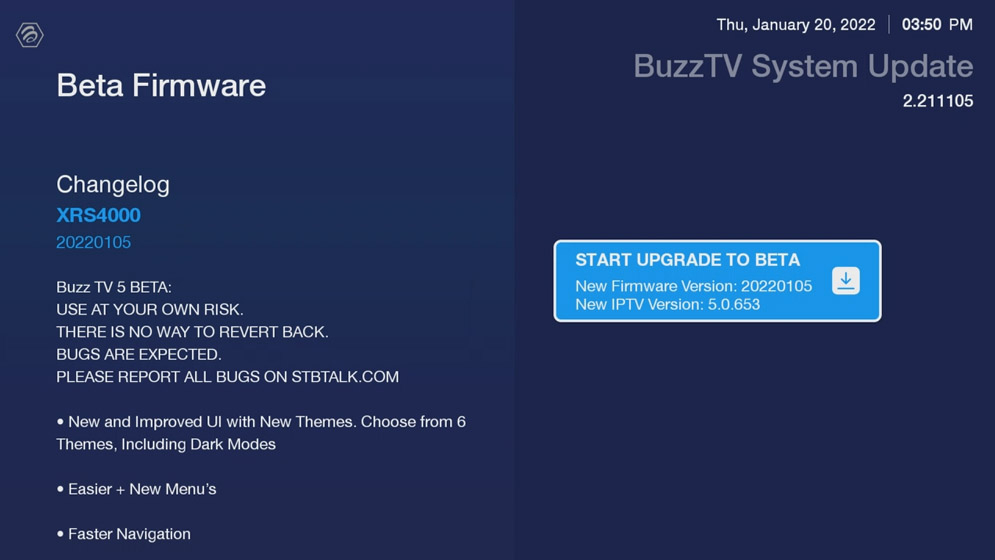
Follow these steps to update your 4200 series to Buzztv 5 Beta Buzz TV 5 BETA: USE AT YOUR OWN RISK. THERE IS NO WAY TO REVERT BACK. BUGS ARE EXPECTED. PLEASE REPORT ALL BUGS ON STBTALK.COM 1. Make sure your WIFI or LAN line is connected. 2. Scroll down to Update and Select it. 2. Check for latest update and it should be (( V20211111 )) 3. Now using your Remote you have to type (( 2015 )) and it will start checking for beta update. - If you didn't get the update Click Here to learn more... 4. When you see this update click Start Upgrade to Beta, 5. Now Let Downloading finish and reboots your box after word. 6. Enjoy Your Buzztv 5 beta upgrade.