
Tato
Members
-
Joined
-
Last visited
Everything posted by Tato
-
Update went smoothly and was completed in 6-7 minutes.
-
Turned on X5 and got a message of available update with OTA screen. Declined for now. Waiting to see how it goes for others.
-
Micro SD card to 811, then OTA for 919. Both went smoothly and quickly on my X5. 👍
-
Its unfortunate allaboutbuzz can't read or speak for himself. What's also unfortunate is the false pretense you, nbs, present as knowledgeable and helpful. You're not. What I will do is contact Buzz through their website.
-
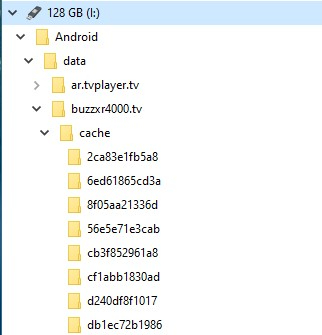
I tried uploading a pic, but it didn't work. When using timeshift, it will record over the file in use. Every time a new timeshift session starts, a new file is created. This is how the cache can completely fill all available space on the external drive. When that happens, timeshift no longer functions due to a lack of space. I'm deleting the files now as part of weekly maintenance. Maybe this will be addressed in a future update, or not. Just wondering if there was another way to empty the cache.
-
X5 v20220624 Buzz TV 5 v5.0.727 128 GB USB External Storage Timeshift set to Force USB TS The feature works as designed, but will eventually fill the USB drive. I've been removing the drive and deleting the files on a PC. Neither file app on the BuzzTV 5 homepage can take you to the cache, stopping at the Data file. Is there another way of deleting the timeshift files that are no longer required?Thank you for the quick response and further explanation on scheduled recordings. 👍🍺I hadn't considered an open connection was always active if the TV was turned off first. Out of habit, I shut off my streaming device first. Hopefully the Buzz team will clarify how their product is designed to function.X5 v20220624 Buzz TV 5 v5.0.727 Powerkey set to Suspend Samsung 4K TV HDMI CEC set to off in X5 and TV Schedule recording, leave X5 on, turn TV off. X5 power LED turns red. Recording occurs as scheduled. Works in both Buzz TV 5 and Tivimate. I run a VPN on the X5. When X5 and TV are on, VPN dashboard shows active connection. When TV off for scheduled recording and X5 power LED turns red. the VPN connection is not terminated but maintained until the TV is powered back on and then X5 turned off. Is this the way scheduled recordings were designed, to maintain an active connection?Put yourself on that list. You only think you know. Will you two pleas refrain.You need to learn manners. You're rude.Update downloaded and installed. Reboot box appeared and I selected it. X5 powered off and on. Initial Buzz splash screen appeared. That was 10 minutes ago and nothing has changed. Still at initial splash scree. The other two updates went smoothly. This one hasn't. What can I do to get the X5 functional again?Many thanks for your post Papa. I am updating now. 👍 And thanks to BuzzTV!Please restore the original powerkey definitions.
 The new update has changed the way my X5 starts. Power on initiates a restart with the initial splash screen. My VPN doesn't start with power on as before, but requires a manual start from the home screen. I preferred the previous power on function and hope to see it return in a future update.